INTRODUCTION AND SCOPE
An Atmega 328P without arduino board can achieve the same capabilities of the arduino board, using the same arduino IDE programming and coding environment. Using an Atmega 328P chip without arduino board is powerful, cheap and functional. This procedure explains how to design and develop a simple, small sized and fully functional arduino clone.
MATERIALS AND EQUIPMENT
Arduino UNO, Atmega 328P, 10kOhm resistor, 16Mhz resonator.
PROCEDURE
- Before wiring the two boards, familiarize with the pin configurations of the Atmega 328P on page 3 of the datasheet (Hardware resources, link 1)
- Switch on the PC, open the Arduino IDE and connect the Arduino Uno board with USB connection. Select the board and serial port corresponding to the Arduino Uno board in the Arduino IDE>Tools. These are standard steps for Arduino board USB connection (Hardware resources, link 2)
- Upload the ArduinoISP sketch onto your Arduino Uno board from the Arduino IDE>File
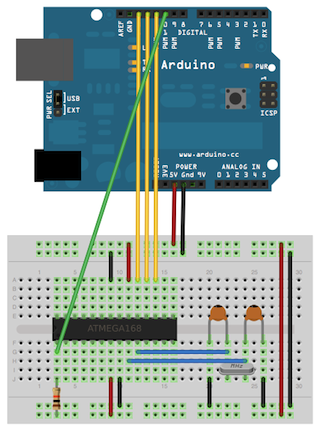
- Wire up the Arduino Uno board and the Atmega 328P on a breadboard (Image 1). The two 18 to 22 picofarad (ceramic) capacitors are optional
- Select “Arduino Duemilanove or Nano w/ ATmega328” from the Arduino IDE>Tools >Board menu
- Select “Arduino as ISP” from the Arduino IDE>Tools >Programmer
- Run from the Arduino IDE>Tools >Burn Bootloader
- Once the bootloader is burnt on the Atmega 328P, switch off the Arduino Uno board by disconnecting the USB cable
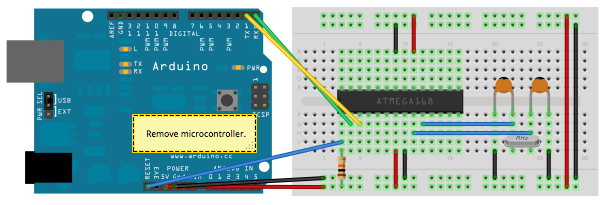
- Remove the microcontroller of the Arduino Uno board
- Wire up the Arduino Uno board and the Atmega 328P on a breadboard (Image 2). The two 18 to 22 picofarad (ceramic) capacitors are optional
- Switch on the Arduino Uno board by re-connecting the USB cable
- Select “Arduino Duemilanove or Nano w/ ATmega328” from the Arduino IDE>Tools >Board menu
- Write and upload any program with the Arduino IDE upload command.
- Unwire the Arduino Uno board
- Provide power supply to the standalone Atmega 328P (Hardware resources, link 3)
IMAGES
HARDWARE RESOURCES
SOFTWARE RESOURCES
CREDITS
DISCLAIMER
The project is provided in the spirit of open source and can be implemented, modified and shared according to CC BY-SA license (see footer). No liability is taken for any issues arising from the provided information.
CHANGELOG
- 24/JAN/2017 – New release